The last weekend of January I had the incredible opportunity to take a masterclass by Pixar Animator Michal Makarewicz. The 18-hour programme of lectures, Q&A, and live demonstrations in Maya covered important topics for animators such as planning, acting and performance, animating dialogue, polish, and many others. However it was Mike’s explanation and many live demonstrations of the layered animation approach that I found most interesting. I hadn’t heard of it until the lead-up to the weekend, and although I had an inkling what this might be, the masterclass clarified Mike’s layered animation practice in detail.
Summary
Points covered in brief:
- Layered animation is an approach, like straight ahead or pose-to-pose. It doesn’t necessarily use the animation layers feature of Maya etc.
- The idea is to animate the main driver of a character’s motion in your shot, usually the Root, maybe the Head, for the whole shot. This is like a base layer. Then animate the next most important controller for the whole shot, then the next, building up the whole performance, layer by layer.
- Mike treats each transform channel on each controller, ie. a single curve in the Graph Editor, as a “layer”. Some animation teachers treat a limb as a “layer”.
- The expertise Mike showed in movement analysis and the concept of portraying the energy of the movement, rather than being guided by golden key poses, seemed to be pivotal in making layered animation, as Mike uses it, especially effective.
- Mike’s demonstrated the concept of a “Master curve” by copying and pasting keys from one spline to another, then adjusting the pasted spline for its new component in the Graph Editor. A way of speeding up his animation workflow.
- This article discusses drawbacks to the layered animation approach.
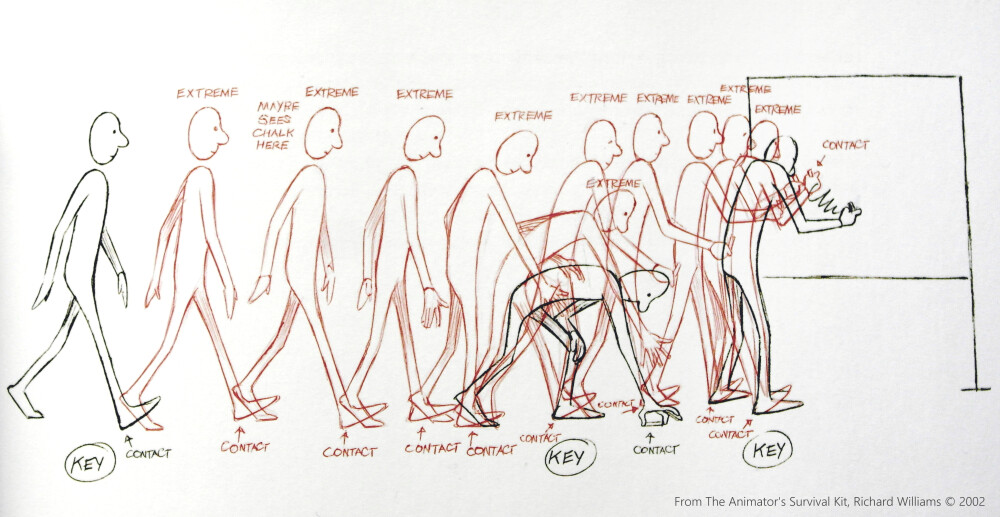
The 4.5th Principle of Animation
Layered animation is a workflow, just as, in Disney’s 12 Principles of Animation, “straight ahead and pose-to-pose” are two approaches to animation in principle four. I already had an idea of what layered animation was before the weekend, as I’d used motion capture for my Skyleigh TRANSFORM!! film. There I had a cleaned-up, motion captured base layer, on top of which I additively animated further layers; facial expressions, hand gestures, foot motion, and more. Maya’s animation layers feature helped a lot with this. However, Mike demonstrated his layered animation technique without making a single Maya animation layer.
Shawn Kelly (one of the Animation Mentor founders) explains the essence of a layered animation workflow in his opening paragraph from this blog post on the topic:
“Layered animation generally refers to the idea of blocking in one part or section of the body at a time. One example would be animating the up/down of the hips in a walk first, and nailing down that timing since it’s going to affect every other aspect of the walk. Once you have that, you could then do another ‘layer’ of animation by animating the torso of the character. Maybe then you’d do the feet. Then the arms and wrists. Then the head. All of those layers will combine to form one walk.”
Later on I’ll explain how Mike’s demonstrations showed this concept of layers of animation combining into a whole taken to a different level. But the core idea is the same.
The following video conveys how one layered approach to animation works in action:
The layered approach seems to be more common for animating walk cycles, run cycles, etc. On the animation classes section of Virginie Michel d’Annoville’s website, she teaches the layered approach for biped walk and quadruped gallop cycles, but walks the student through a pose-to-pose workflow for animating an acting performance.
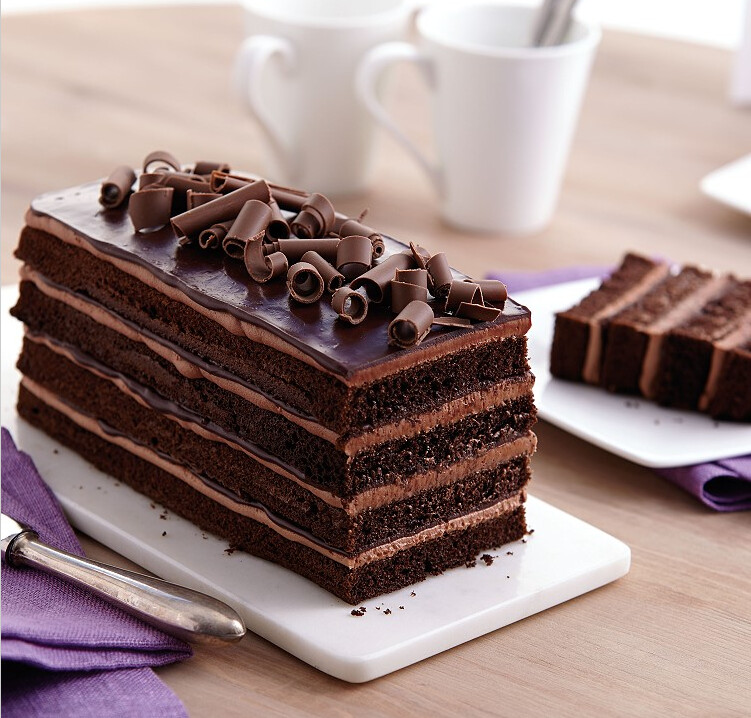
If you imagine your timeline in Maya (or 3DSMax, Motionbuilder, Blender etc.) being like the length of a rectangular layered cake, the process of building up your animation in a layered fashion would be laying the base layer of sponge cake, then spreading on chocolate cream, then layering chocolate sauce, then layering another sponge… and so on building up your animation.
Characteristics of Mike’s layered animation technique
As I discuss layered animation for character performance, I’ll highlight a number of characteristics to Mike’s approach that stood out as aiding in the application of a layered workflow to a performance. During the live demonstrations in Maya he explained what he was doing step-by-step, suitable for 3D animation newcomers to understand, but demonstrating the precision in his way of working.
Mike primarily worked in Maya’s Graph Editor rather than the controllers in the viewport (or in a 2D “picker”) of whatever rig he was using. He recommended Aaron Koressel’s Maya workflow scripts for manipulating keys in the Graph Editor more conveniently, enabling him to work more efficiently. [UPDATE: I'm still constantly using several Koressel scripts assigned to hotkeys in my work as a full-time games animator. ~10/11/2019]
A pivotal distinction of the way Mike teaches and uses layered animation is that he treats each individual Graph Editor curve as a “layer”. I had thought of my experience with motion capture as being “layered” because I added a facial animation “layer” to the mocap, then a hands “layer” and so on. That sounds similar to Shawn Kelly’s explanation of “animating the torso … maybe then … the feet”, limb by limb. But Mike looks at each component of a controller separately, as a “layer”, working constantly in the Graph Editor.
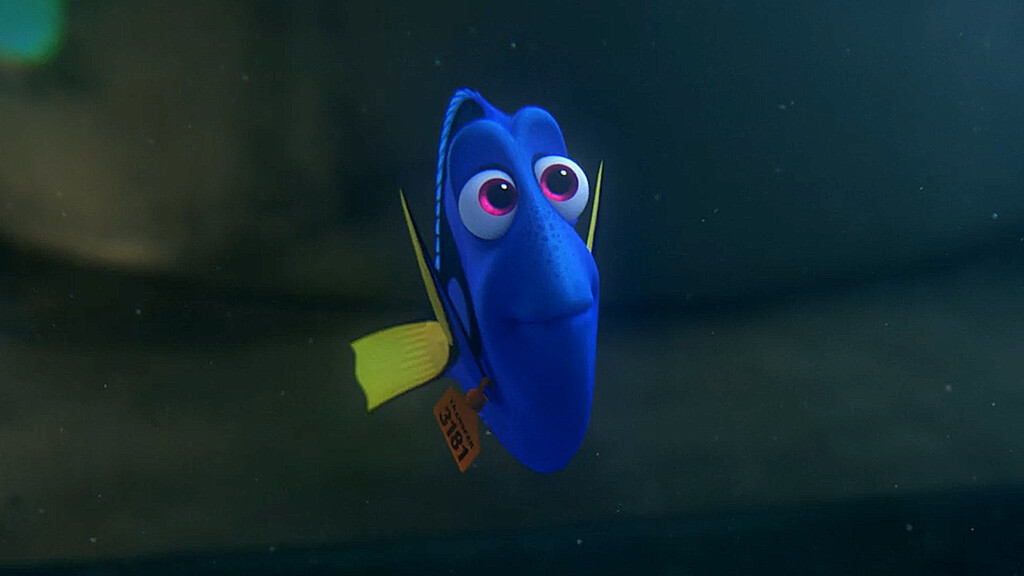
In one of his striking demonstrations Mike opened a scene with a Dory rig and a clip of dialogue. He acted out the dialogue several times through, getting a feel for the acting and envisaging a target performance to animate with the Dory rig. His next step was to identify which controller would most “drive” the performance, and which component on that controller. A good choice might be Translate y (shortened to Ty) on the Root controller. As Mike crafted a spline for Root Ty motion, it was like seeing movements emerge where Dory was convincingly miming the dialogue, albeit in a limited fashion. Next Mike added Tz, building up the motion on the Root controller. With each “layer” being one spline in the Graph Editor, Mike built up the character performance, working from the component giving the most “bang for your buck”, then to the next most impactful, then the next, in an organised fashion.
Not having used this technique I find it hard to imagine being able to engineer good movement in each spline that will add up to an appealing performance. I question how I could imagine just one component’s contribution to a future whole performance, without the context of the other components in motion, too… Mike was very disciplined as he authored splines, eg. making a point that ease in / action / ease out should have keys dividing each section rather than trying to get one curve between keys to do double-duty as, say, both action and ease out. Mike revisited components many times to adjust and tweak them as further components were layered in to the animation. Seeing performances crafted live this way was eye-opening.
This video by Kyle Balda shows the layered animation technique applied to a character performance (watch from 1'40"):
Something Shawn Kelly’s description of layered animation and Mike’s explanation have in common is starting with the main driver of the movement, then the next most important element or component and so on. In another demonstration Mike used the popular Norman rig, starting with Head Ry as the main driver of the performance, rather than starting on the Root. (Mike noted that you need a rig with “head align” for this to work best, or animation you do on the Root after you have animated the Head affects the work you have done on the Head, meaning you need to counter-animate the Head as you work on the Root…) Both animation teachers highlight that you can hide or mute animation layers or parts of the rig you have already worked on, in order to focus on a new part of the process with less distraction.
Mike’s clarity with the Graph Editor seemed vital to reaching an advanced level with a layered animation technique. Personally speaking, the Graph Editor was very intimidating when I was introduced to 3D animation and has become less so with time and practice. I agree with Aaron Koressel calling curves “the building blocks of animation” (see here). It’s very powerful to be able to accurately manipulate the raw material of your animation in detail. Mike emphasised working cleanly with splines, rather than making lots of keys and cleaning them up in a later pass.
It seems like your ability to analyse movement and to break it down in your mind into hierarchical components is another vital skill to getting good with layered animation. Mike linked to this video to show how the classic Disney animators’ work was grounded in skilful movement analysis:
Rough Bambi animation by Milt Kahl, moving volumes in hierarchy drawn-over by Colin Giles.
The “Master curve”: Recycling animation
Mike explained how he speeds up his work by looking out for animation he can reuse. He calls a spline a “Master curve” if it can be used again and again by copying its keys and pasting them to another spline in the Graph Editor. The Koressel scripts mentioned earlier include shortcuts suitable for rapidly manipulating a pasted curve, to modify it so the movements fit on a different component. Specifically Mike showed the use of vertically flipping a curve and changing its amplitude. A simple example of copying and pasting a curve might be animating a character breathing, first by animating a Left Shoulder Ty. The spline from this can then be copied and pasted over to the Right Shoulder Ty. Then it could be pasted to the Chest Scale X, Y, and Z components and adjusted to look appropriate. Perhaps the same curve could be applied to a Head Rotate component to have the character nod subtly along with their breath. Mike copied and pasted “Master curves” to demonstrate how to rapidly build a rich character performance.
Another example was, when animating a mouth to dialogue, layering down the jaw rotation spline, then copying this to the corners of the mouth with a frame or two offset, flipping the spline vertically, if necessary, and amp’ing it up or down to fit. For most times the jaw is open wide, the corners of the mouth should move correspondingly by travelling towards each other, making a stretched mouth shape. But Mike flipped select peaks on the spline when the character was shouting loudly, so the mouth widened as the jaw lowered instead. The stretched mouth shape is physically correct, and the right choice in the right context, but the enlarged mouth shape is emotionally correct, and a better choice, when the context is right for that. Throughout the weekend, as a general animation guideline, Mike taught the audience to go for what’s emotionally correct.
Referring back to the horse gallop layered animation video above, it shows the utility of copying a spline from one component to another, and adding an offset if necessary. Offsetting a pasted animation curve by a frame or two was common as Mike’s demonstrations proceeded at the masterclass.
Are there any drawbacks to layered animation?
Mike was very even in appraising a layered animation approach versus straight ahead versus pose-to-pose. His key critique of his workflow was that, unlike pose-to-pose, layered animation doesn’t emphasise clear, readable silhouette on golden key poses. This makes it arguably less suitable for cartoon-influenced 3D animation. Mike emphasised how energy in motion helps him shape a performance, rather than golden poses. I took this to mean having an intuition for breaking down movement (or body mechanics), as the Bambi video above shows, and for how emotional energy expresses in body language.
Mike’s showreel evidences that a layered animation approach can handle character performance to incredible effect.
It seems to be harder to learn how to use a layered animation approach than other techniques. Shawn Kelly recommends new animators familiarise with pose-to-pose character animation first, and that it’s less appropriate for certain shots, one where the character is fairly static in the frame, for example.
Mike mentioned that layered animators at Pixar are fewer in number than pose-to-pose animators. (Some started out as pose-to-pose animators and learned the layered approach to supplement their technique, learning to switch where desirable.) He mentioned another studio who only use pose-to-pose, in the name of consistency across that studio’s staff.
Getting to grips with layered animation
There was far more to take in during the 18 hours of Mike’s masterclass than just this topic. However I thought it the most unusual element of the weekend and that with the most potential for impact. It’s not a silver bullet and it seems difficult to learn, but with practice it can clearly be very powerful. I’ve tried to detail characteristics of Mike’s technique as he demonstrated and taught that I think have particular synergy with a layered animation process. I hope my notes have clarified this approach to animation, although, once again, it’s nothing compared to seeing a top Pixar animator in action!
It would be interesting to hear from animators who have tried this approach, or who view themselves as a layered animator. I’d like to hear from you if so, possibly for expanding on this in a future article; please leave a comment or email em [at] emeraldsong [dot] com.
A massive “Thank you!” to Cloudscape Studios, who orchestrated Mike’s visit to Carlisle, and who invited applicants to participate in their four week “School for Gifted Movie-Makers”. Thanks also to Creative Skillset [now called Screenskills ~10/11/2019] for funding the course, where I’ve learned loads about animation production, storyboarding, lighting, compositing and much, much more!